A WiFi replacement for your external Atari SX212 modem


What is it?
Introducing the SX212 WiFi Retromodem, an innovative solution that seamlessly replaces the PCB in your existing external Atari SX212 modem. With our latest version, experience a nostalgic journey with added simulated audio featuring dial tone, DTMF dialed digits, ringing and the 1200 baud connect cadence. The SX212 Retromodem is based on the ZiModem V4.0 sources, found on Github. It supports baud rates up to 115,200 via the RS-232 connector. The SX212 WiFi retromodem also supports Atari’s SIO connector at speeds up to 1200 baud. Higher baud rates may work depending on the terminal program.
Why did you make it?
The SX212 WiFi Retromodem provides a non-destructive way to allow older serial based computers to connect to a BBS on the internet via telnet and SSH. Includes an external 5V 1A power supply, not shown.
What makes it special?
Our mission is to merge the charm of retro computing with the reliability of modern WiFi connectivity. The added sounds make the experience all the more compelling. We’ve taken care to ensure compatibly, ease of installation, and an enhanced user experience. Join us in bringing the past and present together with the SX212 WiFi Retromodem.
De minimis Tariffs
As of September 1st, due to a 55% tariff and a 70% shipping cost increase, my cost per modem has increased by $8.10
The price is $99 +$8 shipping +$4.5 PayPal fee +$8.10 Tariff + (CA tax if applicable).
Note: Atari SX212 modem case is not included.
To order, send an email to info@tattlersolutions.com
INSTALLATION
Remove the four screws on the bottom of the Atari SX212 modem. Flip the modem back over so the feet are facing down and place it on a flat surface. Lift the top cover from the front (with the LEDs) at about a 20 degree angle to the back. This is to unlatch the power connector at the back from the top case. Push the top case towards the back and it should release and come free.
With the top cover removed, you should now see the original PCB and speaker. Disconnect the two pin connector near the front LEDs by pulling straight up. Once the speaker is disconnected, lift out the original PCB, being careful not to remove the speaker, and set it aside. It should lift out easily.
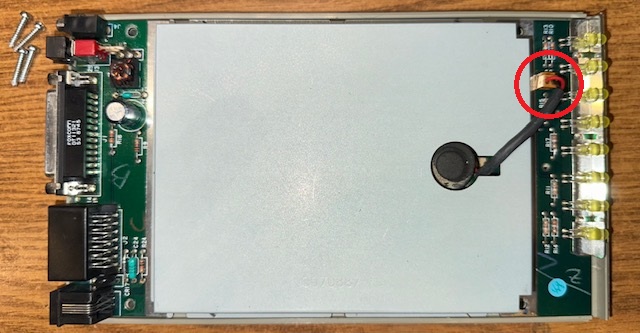
There is a small alignment nub directly in front of the speaker. You will need to snip off the top 1.6mm so the front of the Retromodem will fit flush. You do not need to trim the alignment nubs at the back of the case as there are holes in Retromodem for these nubs.

Place the SX212 WiFi Retromodem in the now empty case and thread the speaker cable through the hole in the middle of the board. The PCB should fit snugly. Connect the speaker cable to the two pin header on the Retromodem labeled “Speaker”. Reinstall the top cover, flip the unit over and install the four screws.

Attach the included +5 Volt AC adapter to the SX212 WiFi Retromodem. Do not use the original Atari AC adapter as it will either not fit or it could damage the Retromodem. Connect the Retromodem to your computer using a 25 pin serial cable (not included). Run your favorite communication program and set the serial port to: 1200 baud, 1-stop bit, no parity, and no flow control. Plug in the 5V AC adapter and turn on the modem. After a few seconds, the Retromodem will send a startup message to your terminal program and say, “READY.”
To configure the WiFi Retromodem, type AT+CONFIG and select “WIFI” to connect the Retromodem to your network. After you have connected the Retromodem to your WiFi network, try connecting to a BBS by typing ATDT telehack.com
Additional modem commands can be found in the README.PDF file located below.